Enter confirmation code

Enter the 6-digit code we sent

It may take up to a minute fro you to receive this code.

00:59

This site is protected by reCAPTCHA and the Google Privacy Policy and Terms of Service apply.

Let's Get You Started

Enter Your Business Name

Select Your Industry

Let us know what you are looking for

What's your budget for this project?

What's the best way for us to reach you to discuss this project?

OR

What's the best way for us to reach you to discuss this project?

    The Ultimate Guide to Creating an App for iPhone

    Introduction:

    Creating an app for iPhone is an exciting venture that opens up a world of possibilities. Whether you’re a seasoned developer or a novice with a great app idea, this comprehensive guide will take you through the entire process, from conceptualization to launching your app on the App Store. Let’s dive in and turn your app dream into a reality.

    Understanding the iPhone App Ecosystem:

    Before you embark on the journey of creating an app for iPhone, it’s crucial to understand the ecosystem you’ll be navigating. The Apple App Store is a vast marketplace, and standing out requires a combination of innovation and strategic planning.

    Key Elements of the iPhone App Ecosystem:

    • App Store Guidelines: Familiarize yourself with Apple’s App Store guidelines to ensure your app complies with their policies.
    • User Demographics: Understand your target audience to tailor your app to their needs and preferences.
    • Competitor Analysis: Research similar apps to identify gaps in the market and opportunities for differentiation.

    Choosing the Right Development Approach:

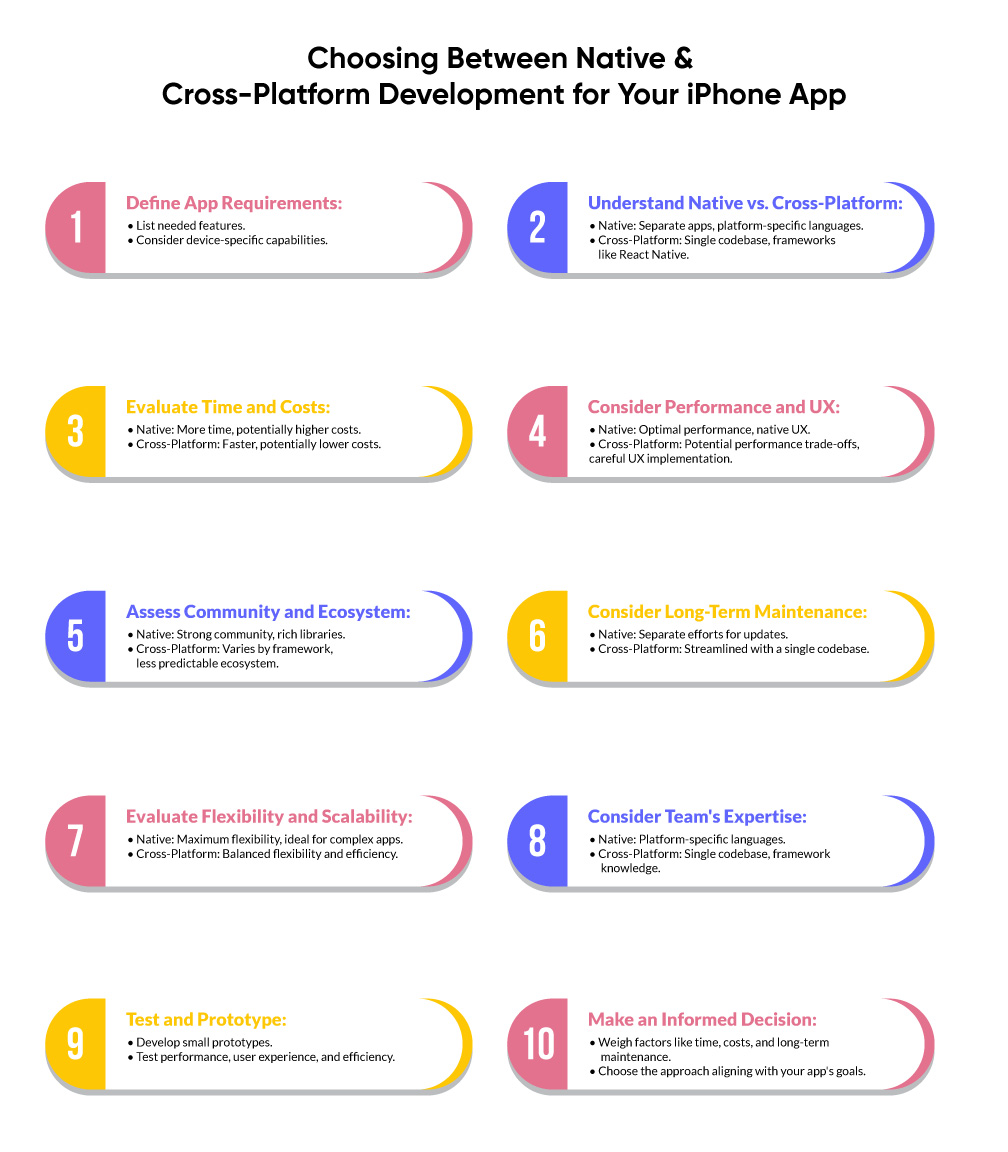
    Once you have a solid concept, the next step is to decide how you’ll bring it to life. The two main approaches are native app development and cross-platform development.

    Pros and Cons of Native vs. Cross-Platform Development:

    Native Development:

    • Pros: Optimal performance, access to device-specific features.
    • Cons: Higher development costs, longer development time.

    Cross-Platform Development:

    • Pros: Cost-effective, quicker development, broader audience reach.
    • Cons: Potential performance trade-offs, limited access to certain features.

    creating an app for iphone

    Creating a Solid App Concept:

    A successful app starts with a well-defined concept. Whether you’re solving a problem or entertaining users, clarity in your concept is paramount.

    Steps to Define Your App Concept:

    • Identify the Problem: Clearly define the problem your app aims to solve or the need it fulfills.
    • Unique Selling Proposition (USP): Determine what sets your app apart from existing solutions.
    • User Persona Development: Create detailed user personas to guide feature development.
    • Wireframing: Sketch a basic layout of your app’s interface to visualize its structure.

    Development Tools and Resources:

    Choosing the right development tools and resources is crucial for building a robust and scalable iPhone app.

    Key Tools and Resources:

    • Swift Programming Language: Apple’s preferred language for iOS app development.
    • UI/UX Design Tools: Use tools like Sketch or Figma for designing your app’s user interface.
    • Xcode: The official integrated development environment (IDE) from Apple for creating iOS applications.
    • Testing Tools: Leverage tools like TestFlight for beta testing before the official launch.

    Coding Your iPhone App:

    Now, let’s get our hands dirty and delve into the coding process. Whether you’re coding solo or working with a team, organization and adherence to best practices are vital.

    Steps in the Coding Process:

    • Project Structure: Organize your codebase with a clear and scalable structure.
    • Version Control: Use platforms like Git to track changes and collaborate with team members.
    • Swift Coding Standards: Adhere to Swift coding standards for consistency and readability.
    • Regular Testing: Conduct thorough testing during the development process to catch and fix bugs early.

    Designing a User-Friendly Interface:

    A visually appealing and user-friendly interface is crucial for the success of your app. Users should find your app intuitive and enjoyable to navigate.

    UI/UX Design Best Practices:

    • Simplicity: Keep the design clean and intuitive, avoiding unnecessary clutter.
    • Consistency: Maintain a consistent design language throughout the app for a seamless user experience.
    • User Feedback: Provide visual and interactive feedback to users for their actions within the app.
    • Responsive Design: Ensure your app’s design adapts to various screen sizes for a consistent experience on different iPhones.

    Integration of Core Features:

    Your app’s success hinges on the functionality it offers. Integrate core features that align with your app’s concept and provide value to users.

    Core Features for an iPhone App:

    • User Authentication: Implement secure and user-friendly authentication methods.
    • In-App Purchases: If applicable, integrate a smooth in-app purchase system.
    • Push Notifications: Keep users engaged with timely and relevant push notifications.
    • Offline Functionality: Ensure your app functions seamlessly even without an internet connection.

    Optimizing for Performance and Speed:

    A laggy or slow app can turn users away. Optimization is key to delivering a smooth and responsive user experience.

    Performance Optimization Tips:

    • Minimize Resource Usage: Optimize images, videos, and other assets to reduce the app’s size.
    • Background Processes: Limit background processes to conserve device resources.
    • Caching: Use caching practices for storing commonly accessed data locally.
    • Code Profiling: Use profiling tools to identify and eliminate performance bottlenecks.

    Testing Your iPhone App:

    Thorough testing is a non-negotiable step before launching your app. Identify and address any issues to ensure a polished user experience.

    Comprehensive Testing Checklist:

    • Functionality Testing: Test all features and ensure they work as intended.
    • Compatibility Testing: Verify your app’s compatibility with different iPhone models and iOS versions.
    • Security Testing: Conduct security assessments to protect user data.
    • Usability Testing: Gather feedback on the user experience and make necessary adjustments.

    Preparing for App Store Submission:

    Congratulations on reaching this stage! Now, it’s time to prepare your app for submission to the App Store.

    App Store Submission Checklist:

    • App Store Guidelines: Review and adhere to the App Store guidelines to avoid rejection.
    • App Metadata: Prepare compelling app descriptions, screenshots, and icons.
    • Beta Testing: Conduct thorough beta testing using TestFlight before the official submission.
    • App Store Connect: Set up your app on the App Store Connect platform and submit all necessary details.

    Table: Key Steps in App Store Submission

    Step Description
    1. Review Guidelines Familiarize yourself with Apple’s App Store guidelines.
    2. App Metadata Prepare compelling descriptions, screenshots, and icons.
    3. Beta Testing Conduct thorough beta testing using TestFlight.
    4. App Store Connect Set up your app on the App Store Connect platform.
    5. Official Submission Submit your app to the App Store for review.

    FAQs

    Q1: How long does it take to develop an iPhone app?

    Features, team size, and complexity all affect how long a project takes to create. On average, it can take anywhere from a few months to a year.

    Q2: Can I update my app after it’s live on the App Store?

    Yes, you can update your app post-launch. Regular updates are crucial to fix software errors, introduce new functionalities, and enhance the overall quality of user interaction.

    Q3: How do I monetize my iPhone app?

    Monetization options include in-app purchases, ads, subscription models, and upfront app purchases. Choose a strategy aligned with your app’s purpose and target audience.

    Q4: What is TestFlight, and why should I use it?

    TestFlight is Apple’s beta testing platform, allowing developers to test their apps with a select group of users before the official release. It helps identify and fix issues early on.

    Q5: What marketing strategies can I employ to promote my app?

    Marketing strategies include leveraging social media, creating a website, optimizing keywords for the App Store, engaging with influencers, and utilizing various digital marketing channels.

    Conclusion For Creating an App for iPhone

    Creating an app for iPhone is a rewarding journey that demands dedication and meticulous planning. From conceptualization to App Store submission, each step plays a crucial role in the success of your app. Follow this comprehensive guide, stay innovative, and soon, your app could be delighting users worldwide.


    Welcome to Appxide, where innovation meets utility in the world of app development. Our mission is to craft cutting-edge digital solutions that simplify lives and spark connections. With a diverse portfolio that traverses multiple sectors, we are committed to excellence and user-centric design. Stay tuned to our blog for the latest in tech, insights, and the stories behind our projects. Dive into the future with us – where every app we create is a step towards the extraordinary.